How to use blank Canva template – Click and the check the instruction video
How to use pre-design Canva template – Click and the check the instruction video
Canva is a free, online design software. It uses a drag-and-drop format and provides access to over a million photographs, graphics, and fonts. It is used by non-designers as well as professionals. The tools can be used for both web and print media design and graphics.
With a few simple clicks, you can design and create gorgeous, professional labels from Canva’s pre-designed fonts, images, icons and layouts.
On this page, we will walk you through the steps for creating labels in Canva.
For empty Canva template, we have already import the sheet labels’ outline as the backgound image.
Remember to adjust the backgound image’s transparency ratio to 0% before download your design as a PDF file.
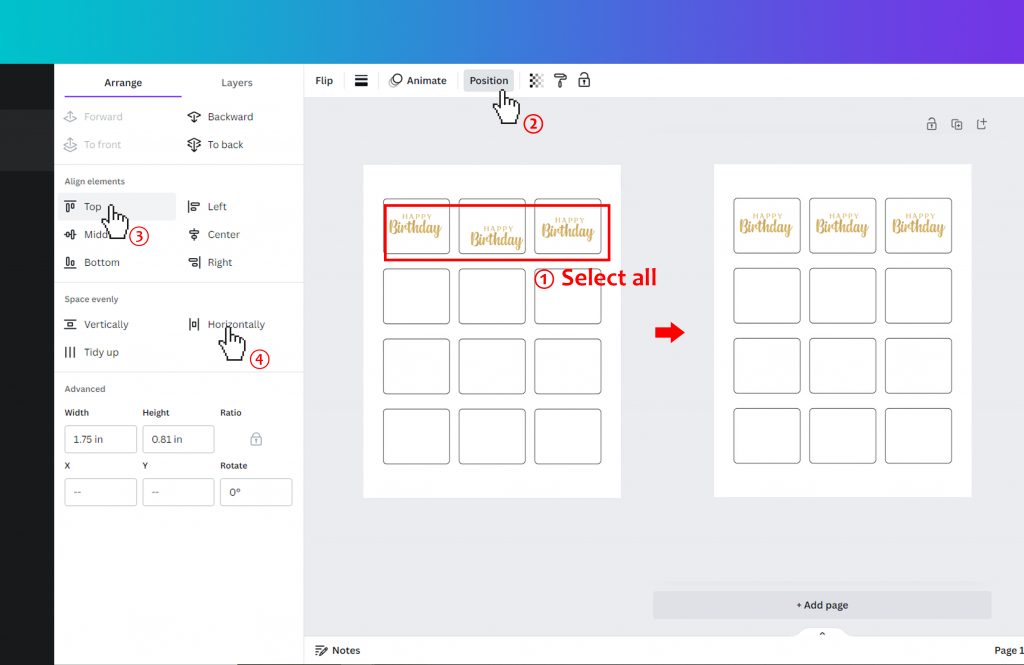
Suppose the sheet label have N columns, M rows. All the labels’ contents are the same.
1 – First, design the top left label, then group all the design elements.
2 – Copy the design of the first label, and move it to the last column of the first row, adjust the horizontal positon.
3 – Make N-2 copies of the first label’s design.
4 – Select all the N designs, Choose “Position” from the toolbar, click “Align elements Top” and “Space evenly Horizontally”
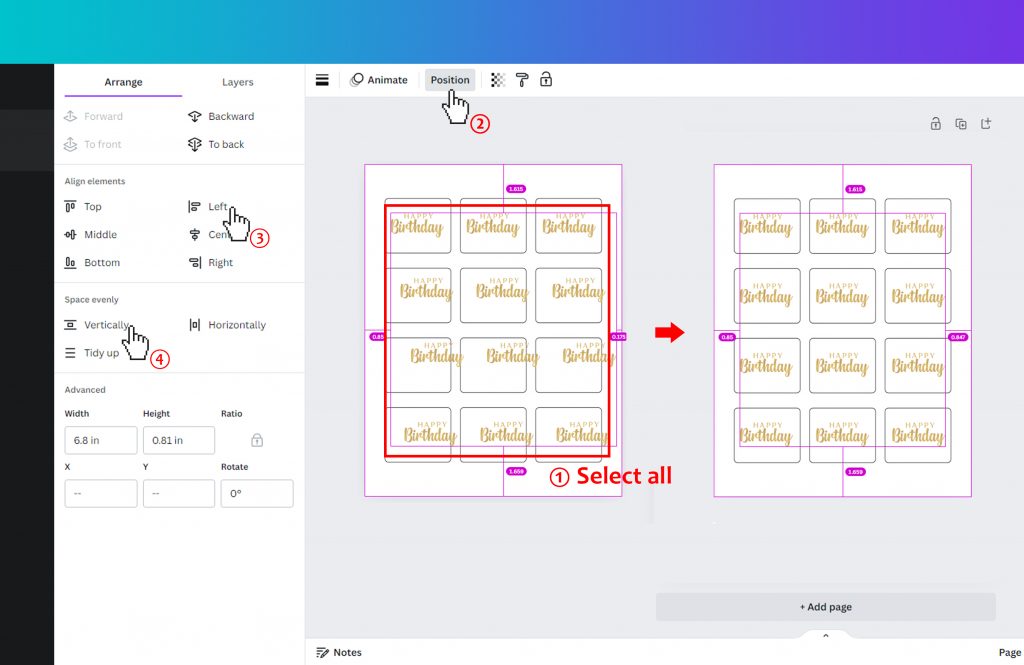
5 – Select all the design of the first row, then group.
6 – Copy the design of the first row, and move it to the last row, adjust the vertical postion.
7 – Make M-2 copies of the first row’s design.
8 – Select all the M designs, Choose “Position” from the toolbar, click “Align elements Top” and “Space evenly Horizontally”
9 – Choose the background image, and adjust the transparency ratio to 0%
10 – Download your design as PDF file, then print it.
Other tips
1 – Don’t change the background image.
2 – Test on a plain white paper before printing directly on your labels.
Respectfully, why are these programs and instructions always written to software people and not to people who have no clue about certain terms etc? Is there truly no easy way to copy my designed label on Canva and just Paste it on the labels in Word?
Your instructions, to me, makes no sense and I feel dumb and brain locked.
I wanted to say thanks but … for what?…
Hello,
Thank you for your suggestion. We will update the user guide accordingly. Your feedback is valuable to us and greatly appreciated.
Best Regards
Hi,
Since you’re designing the label in Canva, you can use the Canva Label Sheets app to export and print your design directly onto any label sheet of your choice. Simply select the brand and template code, and it will be ready to go—no manual adjustments needed 🙂
I feel Exactly the same way
I have 2-1/2 x 1-1/2 oval labels and I have added text. What I would like to do is outline just that oval with a think green outline. How do I do that.
Dear gellerbabe,
Glad to help. If you are using Canva template, you can follow the following steps to add oval outlines on each label:
1. Select “Elements” from the left side bar.
2. From the “Shapes” choose round shape.
3. Adjust the round shape into oval by dragging the frame.
4. From the upper bar, click “color”, and select “No color” under “Document colors”.
5. Click “Border Styles” aside color, and choose the outline style you need, after doing this you can see a new icon which is “border color” icon appears on the left side of “Border Styles”, click it.
6. Choose a green color from defaut color or adjust a green color yourself from “add a new color” under “Document colors”
Duplicate and align the outlines to each label:
1. Hold down the “Alt” key, click on the elements, and drag them downward. You will see that the outline is copied. Keep the left mouse button pressed while dragging, and hold down the “Shift” key to ensure that the copied elements align vertically with the original ones. Of course, if you don’t press the “Shift” key, you can use the alignment lines to check if the copied elements are aligned with the original ones. Now, let’s drag the copied elements to the bottom position of the label.
2. click on the first element, press “Ctrl+C” to copy it, and then press “Ctrl+V” to create 4 more copies. Select all the elements, click on “Position” in the top menu, and then choose “Vertically” in the “Space evenly” section. Now, you’ll notice that the content of the five labels is evenly distributed. Then, click on “Align elements” and choose “left.” You’ll see that the content of each label is now aligned.
3. Select all the oval outline shapes and click “Group”. Than hold down the “Alt” key, click on the grouped oval outline shapes, and drag them rightward.
4. click on the left grouped oval outline shapes, press “Ctrl+C” to copy it, and then press “Ctrl+V” to create 1 more copies. Select all the shapes and click on “Position” in the top menu, and then choose “Horizontally” in the “Space evenly” section. Now, you’ll notice that the content of the five labels is evenly distributed. Then, click on “Align elements” and choose “top.” You’ll see that the content of each label is now aligned.
We also send a e-mail attached a video showing the steps above to your address please check. If you have any other problems please feel free to contact us by e-mail.
Best Regards
I’ve downloaded the canva template for the lip balm labels and the canva template is not aligned to the labels at all. I’m pretty comfortable working in canva and didn’t change anything, but I’m at a loss as to resolve my issue.
https://mr-label.com/articles/10475
Sorry for the inconvenience. Are you having alignment issues when using the pre-designed template?
If so, we suggest saving your design as a PDF and selecting “Actual Size” under the scaling options when printing.
Alternatively, you can download the JPG template and create your own layout in Canva. Just choose the correct paper size (A4 or US Letter), then import the JPG template as the background.
If the problem continues, feel free to reach out — we’re happy to help!