Our PDF templates have been formatted with outlines of labels on sheets for easy use to help design and create labels. Use these templates as a guild line layer. PDF templates will open up in almost all graphic design programs- including popular programs such as Photoshop, Gimp, Indesign, Illustrator, Inkscape and and many more.
CONTENTS
1) What You Need
- Your own computer (Windows or Mac)
- An inkjet or laser printer
- A recent version of Adobe Illustrator
2) Getting Started
- Open Adobe Illustrator. If a “Welcome” screen appears, close it. Select Open from the File menu and, in the Open dialog, navigate to the location of the PDF label template you downloaded from Mr-Label.com.
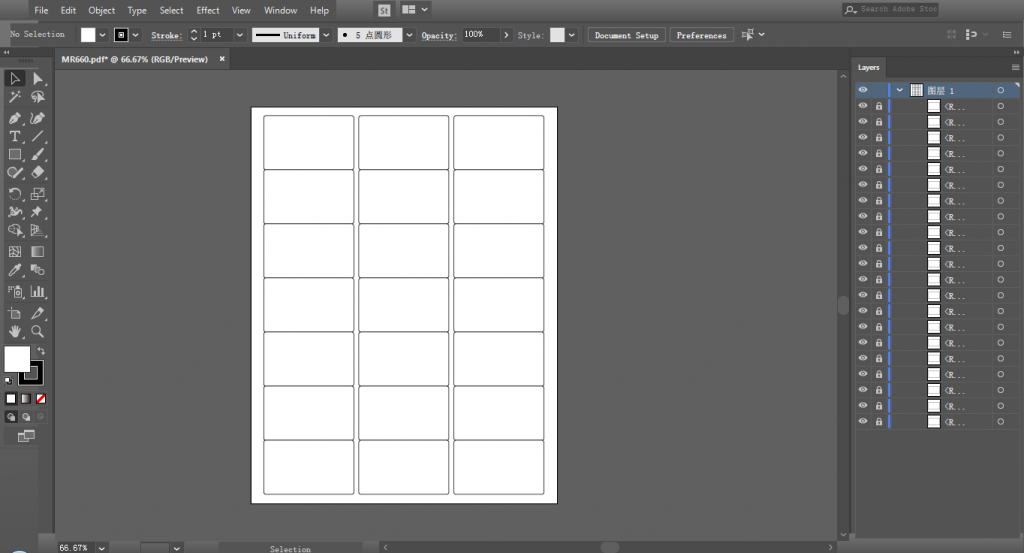
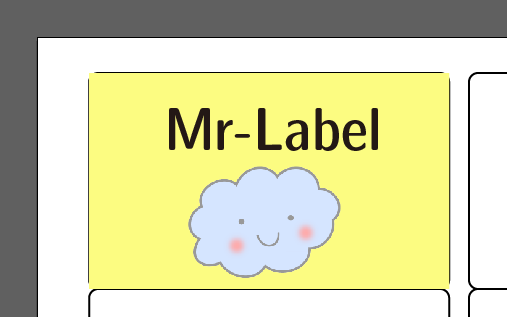
For this project I’m using MR660 template. You should see something like I do (see Figure 1)
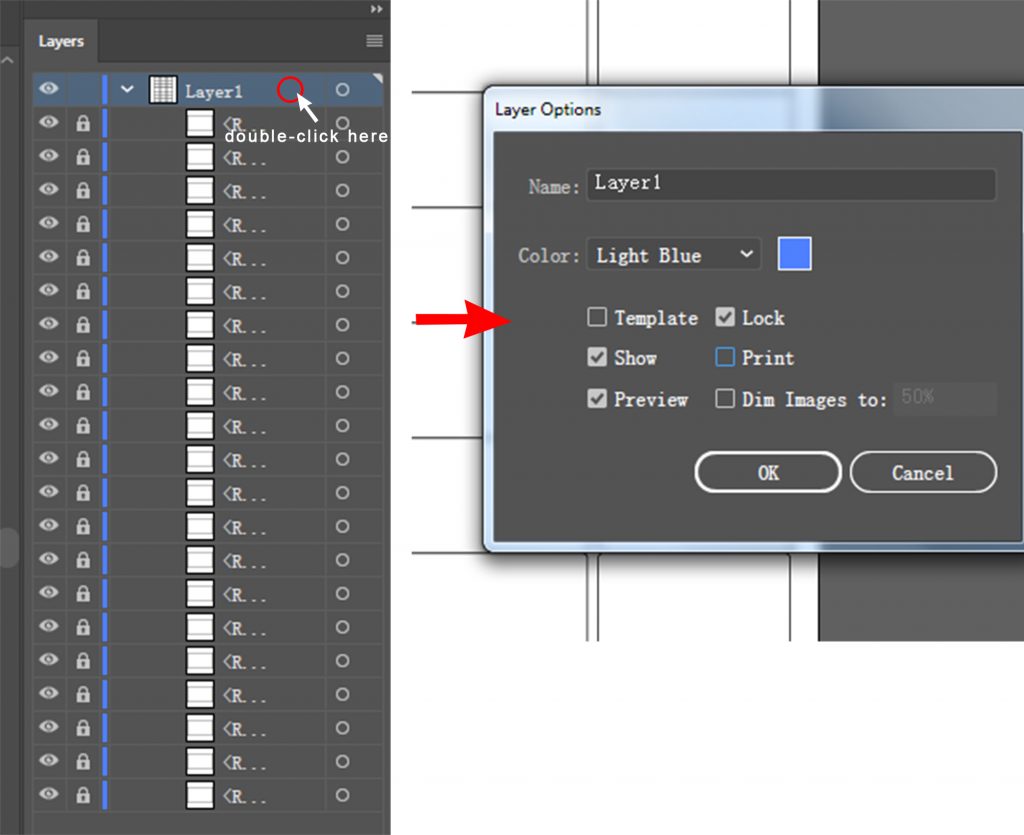
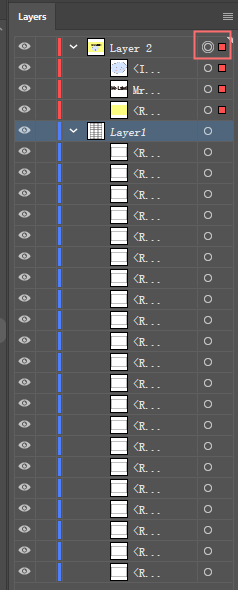
- On the Layers panel, which you can open by choosing Window > Layers, you should see that all the template pieces reside on Layer 1. These objects are guides to help you line up artwork to the pre-cut, self-adhesive labels that will soon arrive in the mail. You need to be able to see the guides, but you don’t want the boxes themselves to print. So, on the Layers panel, double-click the icon beside Layer 1-not on the “Layer 1” text itself. Up should pop the Layer Options dialog (see Figure 2).
- In the Layer Options check the box beside Lock and check the box beside Print. The former prevents accidental changes to the template guides while the latter prevents them from printing while keeping them visible Page Four onscreen. Click OK to close the Layer Options and effect the changes. On the Layers panel a little padlock will appear to the right of the eyeball, which incidentally denotes that the layer is visible, and the Layer 1 title will become italicized to indicate that the layer will not print.
- Now that we’ve locked Layer 1 to prevent accidental changes to the guides, we have nowhere to draw (all objects created in Illustrator must be on layers). Returning to the Layers panel, click the Create New Layer icon at the bottom of the panel; the Create New Layer icon looks like a sticky note and is to the right of the trash bucket (Delete Selection) button. Illustrator will insert Layer 2 above Layer 1. Layer 2 is where we’ll create the personalized return address label, and it will print.
3) That’s it for the setup. Now we’re ready to get to the fun part
· Designing the First Label
Designing the First Label The real trick to designing your own personalized return address labels-or any project wherein one design will appear multiple times on the page-is to concentrate entirely on one instance, one label. In the case of my labels, there are 21 copies per page; I need to think about one and pretend the other 20 don’t exist-at least for now. No matter how many labels are in your template, focus on just one-the top left one-until it’s exactly the way you want it. After that, we’ll use special features built into Illustrator to not only duplicate the design throughout the rest of the page, but also make it so that, if you need to change all the labels, you’ll only have to manually change one label in order to change all the labels.
· Let’s begin by creating the basic elements necessary for all personalized labels.
- Select the magnifying glass-like button on the Tools panel to access the Zoom Tool. Click once in the center of the first label in the top-left corner of the page to zoom in. Keep clicking and zooming until it fills or mostly fills the screen (the document window).
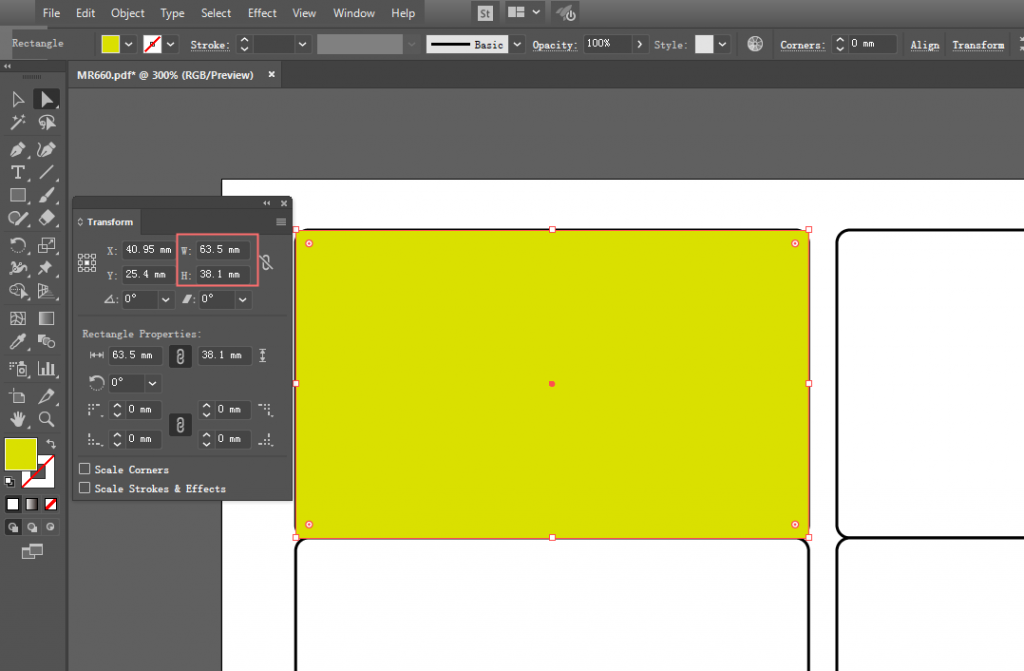
- Begin by grabbing the Rectangle Tool from the Tools panel. Then, by clicking and dragging, create a rectangle that is the size of the first label, and completely covers it. (Don’t worry that the sharp corners of your rectangle extend beyond the rounded corners of the guide; the labels are precut, so when you print, excess ink beyond the corners will be discarded anyway.)
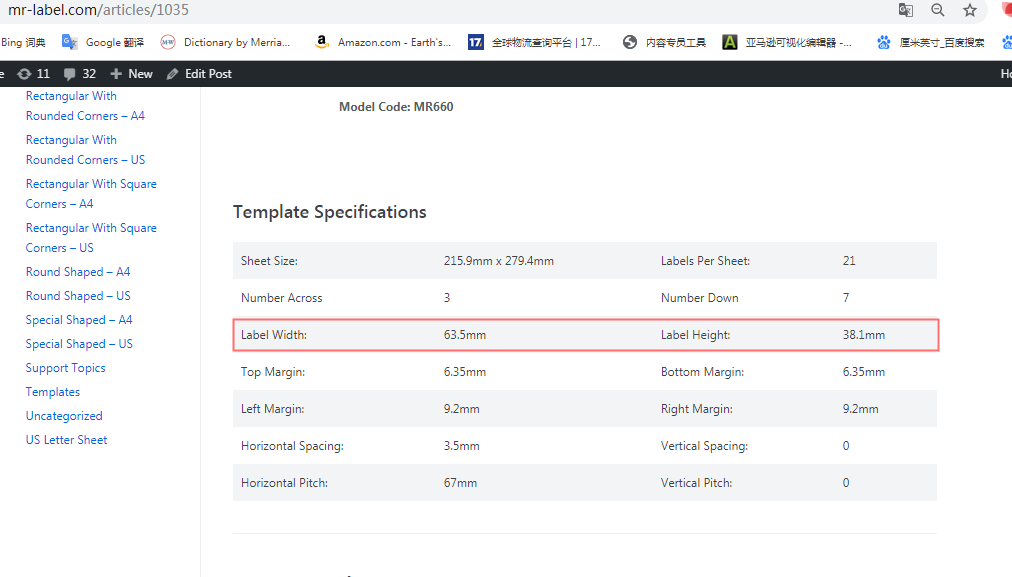
- With the rectangle still selected, open the Transform panel from the Window menu. Revise the Width(W) and Height(H) of the rectangle, make sure they are the same as the label (That information is conveniently provided for you on Mr-Label.com, on the label product page.) (Figure.3)
- Design your labels and fill in the content you need. (Fig.4)
4) Filling Up the Label Sheet
Once you have the first label exactly the way you’d like the page of labels, it’s designed, done, and ready to go, it’s time to use it as a template for filling up the sheet.
· Preparing the First Label
- Ensure that all parts of the design fallen entirely within the background rectangle.
- Remember when we locked the background rectangle to keep it safe and out of our way? Now we need it again, so we need to unlock it. From the Edit menu select the Unlock All command to unlock the background rectangle.
- Press CTRL+A/CMD+A to select all the objects in your label, including the background rectangle
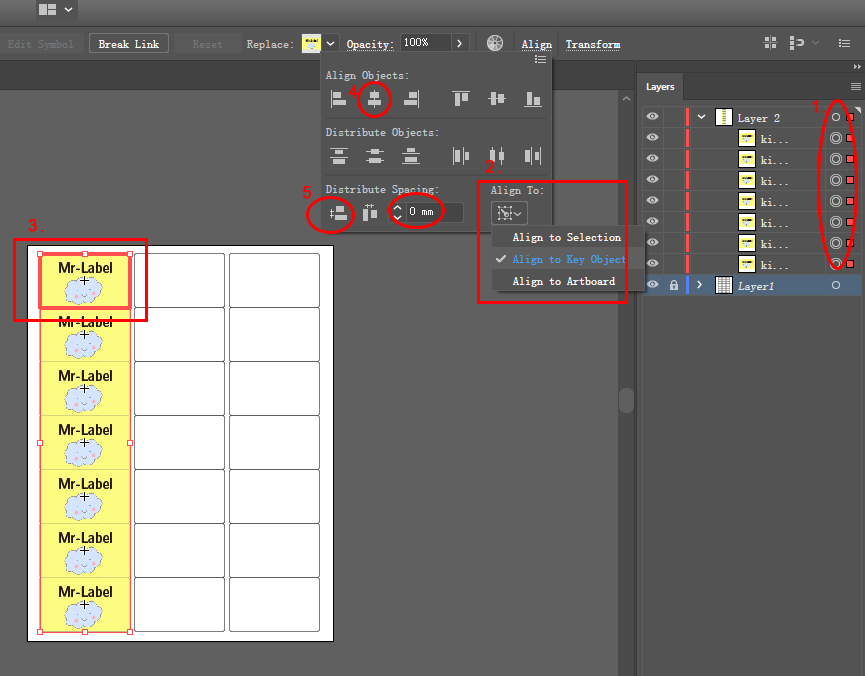
- Select all the objects in your label, including the background rectangle by click the round circle at the end of each layer. (Figure.5)
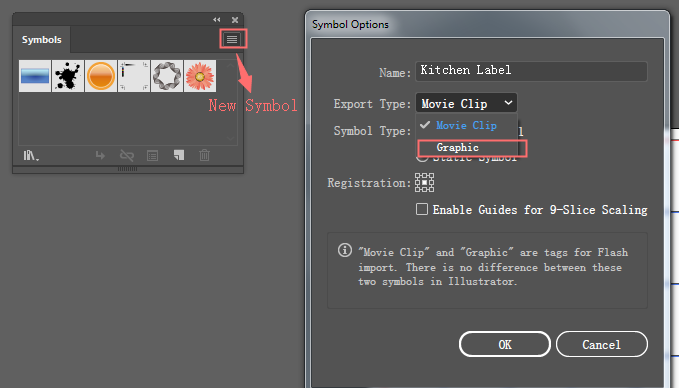
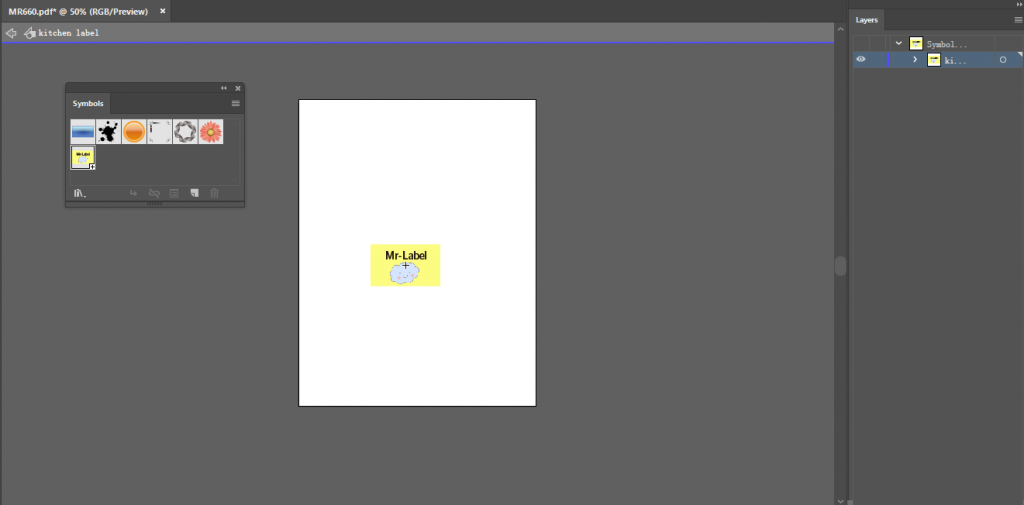
- From the Window menu, open the Symbols panel, and, on the little fly out menu at the top of the Symbols panel, choose the New Symbol command (see Figure 6.) The New Symbol dialog will pop up. In it, type a meaningful name for your label-something like “Kitchen Label” for example-and, if your version of Illustrator includes the option, set the Type to Graphic. More important is the fact that the real artwork has been moved to the Symbols panel, and what you see on the art board is only a symbol instance, a reflection of the actual artwork now residing within the Symbols panel. The point and power of symbols is that, no matter how many copies you make, how many symbol instances you place on the page, they are all identical reflections of the original-if you change the original, all the instances change, too, without you having to edit all those copies manually. Symbols are the secret to creating and editing designs like a label sheet without tearing out your hair.
· Filling the Page
With the symbol defined, it’s time to add the other instances and fill the page of labels.
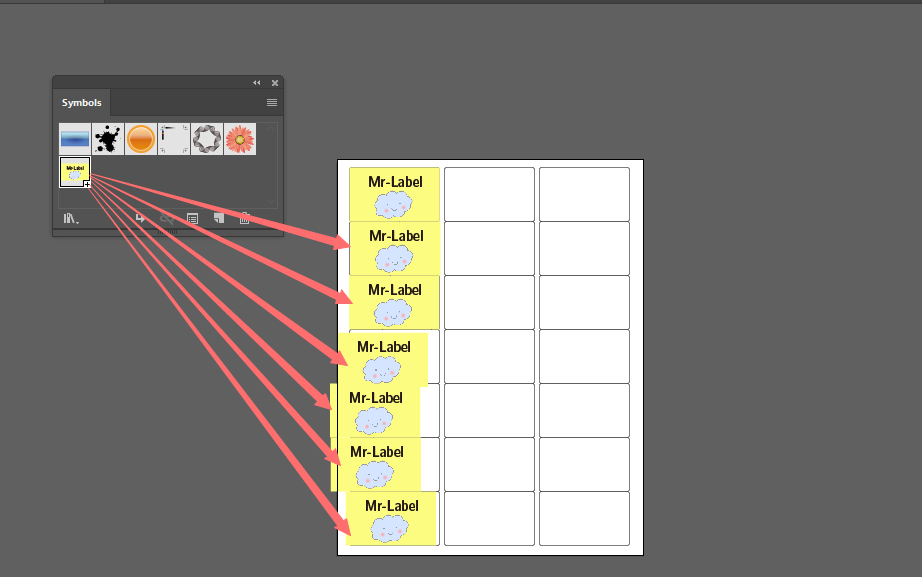
- For each additional label in the column, drag the symbol you created from the Symbols panel and drop it on the art board. For instance, the MR660 labels I’m working with are arranged in three columns of 7 labels each. Therefore I’ll drag my “Kitchen Label” symbol from the Symbols panel 6 times, creating 6 instances in a column beneath the first one (see Figure 7). Depending on the label template you’ve chosen, you may need more or fewer instances. Don’t worry about rows right now. Focus only on the first column, instances arrayed vertically, top to bottom, leaving other columns blank. Try to get each instance close to where it should be, but you needn’t worry if it doesn’t exactly match up with the label guide.
- Now line up the first column. Select all the 7 labels. Click ‘Align’, choose ‘Align to Key Object’. Select the first label you made, which have been lined up with the top-left label frame, and then click ‘Horizontal Align Center’. Now the labels are aligned horizontally. Next you need to check the Vertical Spacing of each label, which is 0mm, so enter ‘0 mm’ in Distribute Spacing and click ‘Vertical Distribute Space’. Now the labels are well aligned. (Fig.8)
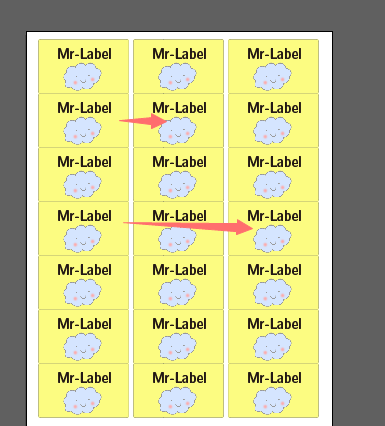
- Drag the column until it’s roughly in the right place to fill up the next column of the page, and then repeat the paste and move until you have all columns filled.(Fig.9)
- Before you print (File > Print) a hundred pages of the same label, take some time to print a single test sheet. Computers and printers vary widely, and, although the template you’re using may be flawless, the page image might shift a little bit during printing such that your artwork doesn’t perfectly align to the pre-cut labels. This is very, very common, as a matter of fact. Save a bunch of ink, label sheets, and Page Twenty Three frustration by printing a single test page on blank paper, and then, holding the printed page and a blank label sheet together against a window or lamp, check the alignment of the label images relative to the label cut marks. If they don’t line up, use the Selection Tool to move columns or rows of labels (ungroup them if necessary), and possibly even re-align or redistribute with the Align panel, until your test print page matches the pre-cut label paper. When your test print matches perfectly, do one final test print-a single page on one label sheet-as a final check before printing multiple copies of the same page. Don’t forget to save your document (CTRL+S/CMD+S) often!
· Making Changes
- On the Symbols panel click once on your label symbol to highlight it (an outline will appear about the symbol to denote that it’s selected.)
- At the top right corner of the Symbols panel is a button to access a fly out menu. Click it and choose the Edit Symbol command from the menu.
- When you choose the Edit Symbol command you’ll be brought into a special editing mode and environment (see Figure 10). Your main document will be temporarily hidden, and in its place you see and have full access to all the objects that make up the symbol. In this case you’ll be able edit your label again.
- Make whatever changes you like, and then, at the top left of the document window, where the vertical and horizontal rulers intersect (if they’re showing on your screen), click the arrow beside the symbol name to commit your changes and return to the normal document editing mode. When you do, you’ll see that every symbol instance on the page-grouped or not-has updated to reflect your changes. No muss, no fuss.
· Finished
After the label is well designed, save it as PDF and print!
Dear customer,
We sent the designed template to your email address according to your requirements, please check.
Any further questions, please feel free to contact us.
Could you please send me the easy design template?
Dear customer,
All of our templates are blank, so that customer can design their own artwork. If you have any trouble shile designing, please send email to us.
I see that I must pay for Adobe Illustrator… Are there any free downloads of other software that will work?
Dear customer,
We would suggest you to downlowd our LibreOffice template, which is one of the friendliest and fastest-growing projects in the free and open source software world. Here is the instructions: http://mr-label.com/articles/2711
Another way, you can download JPG. pictures and design on a free online design software like Canva, here is the instruction: http://mr-label.com/articles/3170
Any further questions please feel free to cantact us.
I cannot get this to print labels without them being off which basically is a ruined page. I regret my purchase. Can’t believe how difficult it is to print. I did not realize I had to be an IT tech just to print labels.
Dear Customer,
We are terribly sorry that you are not satisfied with your purchase.
Your review is valuable for us to improve our product quality and design. If you don’t mind, please feel free to contact us for more details about the print problem.
We strive to offer the 100% satisfaction for all our customers and will try our best to resolve customer problems.
Thank you for giving us the opportunity to make this right
Sincerely,
Mr-Label
Retain up the terrific piece of function, I read few content material on this website and I think that your web weblog is actual intriguing and has got circles of good info .
[…] Adobe PDF TemplateDownload How to use PDF template […]
I agree with Just me posted Oct. 28, 2020. I’ve bought Mr328 lip balm labels, designed them with Adobe Illustrator, but the background will NOT allign with the designs together. Trying to get them printed has been a waste of time, ink, paper, & labels, also money because now I have to buy more ink & labels. Any help to correct this problem would be greatly appreciated. Thank you.
I understand your frustration with the alignment issues while trying to print your Mr328 lip balm labels. Let’s try to resolve this issue step by step:
Check Document Setup in Adobe Illustrator:
Ensure that the dimensions of your design in Adobe Illustrator match the actual dimensions of the Mr328 lip balm labels. Incorrect dimensions can cause alignment issues.
Verify the bleed settings. If your design goes to the edge of the label, make sure you have set up a bleed in Illustrator.
Printer Settings:
Make sure your printer is set to print at ‘Actual Size’ and not scaling the print.
Check the printer’s alignment settings. Some printers have an option to adjust the print alignment.
Test Prints:
Before printing on the actual label sheets, do a test print on regular paper. This helps to check the alignment without wasting label sheets.
Place the test print over a label sheet against the light to see if the design aligns with the labels.
If the problem still exist please feel free to contact us by E-mail: services@mr-label.com
Have a nice day.
Best Regards